Subscribe to the Youtube InspireUI Channel, like, and press the bell icon to get notifications for free instructional videos. Please refer to the latest document in https://support.inspireui.com
1. Setup Flutter envoriment
Choose an operating system where you are installing Flutter:
Mac OS:
- Document guide: https://flutter.dev/docs/get-started/install/macos
- Video guide:
- Flutter 1.x:
-
Flutter 2.x:
Window:
- Document guide: https://flutter.dev/docs/get-started/install/windows
-
Video guide:
Flutter 1.x
Flutter 2.x
Linux: https://flutter.dev/docs/get-started/install/linux
Setup an editor: https://flutter.dev/docs/get-started/editor
2. Test drive
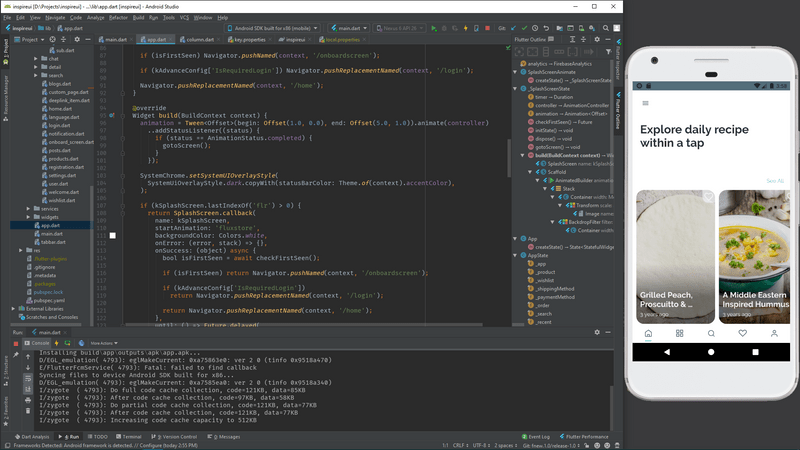
This section describes how to create a new Flutter app, run it, and experience “hot reload” after you make changes to the FluxNews app.
Select your development tool of choice for writing, building, and running Flutter apps.
The below steps use for the Android Studio development tool:
Create the Example app
- Open the IDE and select Start a new Flutter project.
- Select Flutter Application as the project type. Then click Next.
- Verify the Flutter SDK path specifies the SDK’s location (select Install SDK… if the text field is blank).
- Enter a project name (for example,
myapp). Then click Next. - Click Finish.
- Wait for Android Studio to install the SDK and create the project.
Tip: The code for your app is in lib/main.dart. For a high-level description of what each code block does, see the comments at the top of that file.
Video guide:
Run the Example app
- Locate the main Android Studio toolbar:

- In the target selector, select an Android device for running the app. If none are listed as available, select Tools> Android > AVD Manager and create one there. For details, see Managing AVDs.
- Click the run icon in the toolbar, or invoke the menu item Run > Run.
After the app build completes, you’ll see the starter app on your device.

Try hot reload
Flutter offers a fast development cycle with Stateful Hot Reload, the ability to reload the code of a live running app without restarting or losing app state. Make a change to app source, tell your IDE or command-line tool that you want to hot reload, and see the change in your simulator, emulator, or device.
- Open
lib/main.dart. -
Change the string
'You have pushed the button this many times'to
'You have clicked the button this many times'Important: Do not stop your app. Let your app run.
- Save your changes: invoke Save All, or click Hot Reload offline_bolt.
You’ll see the updated string in the running app almost immediately. Congratulation, let get start to install the FluxNews from the download package.
3. Getting Started with FluxNews
This section shows you the way to build Fluxstore app with the demo WooCommerce website.
Video guide:
Manual Document:
After download and unzip the package, use Android Studio to open the project source folder.
- Click the
Get dependenciesorPackages getto install the libraries from pubspecs.yaml file. - Open the simulator to run iOS or Android (as the step 2 above)
- Then press the run button to start project (you can still open multi simulator at the same time)
4. Install Required plugins
Some related plugins that require to work with FluxNews app, these plugins are also available from the download package, or you can download from the below link.
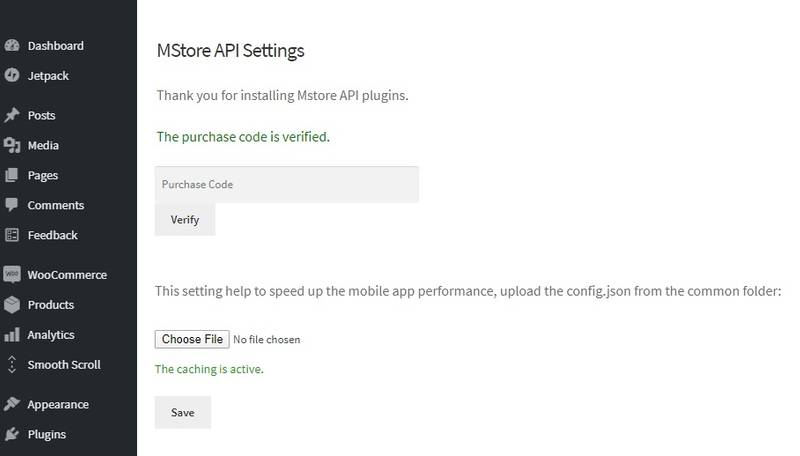
- Mstore API: This plugin is used for support RestAPI to connect to the app, support all Payment Gateway, SMS Login and Facebook Logins. You need to verify the purchase code in WordPress MStore API
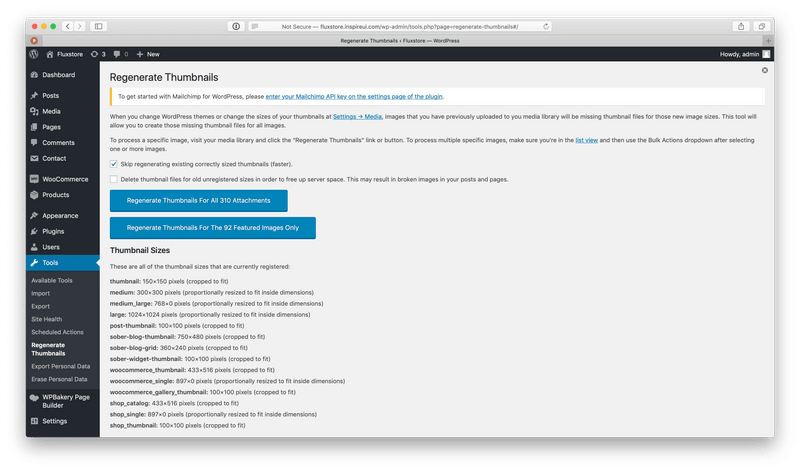
- Regenerate Thumbnails: allows you to regenerate all thumbnails after changing the thumbnail sizes, this plugin is used for customizing the app performance when loading the product images.
These plugins are available from the download package at
resourcefolder
- JWT Authentication: this plugin allows the Author could able create a new Post from the app. If you do not need to create a post from the app, please skip this.
After active above plugins, please try to follow below extra config.
Setup the Regenerate Thumbnails plugin:
First, go to Setting/ Media Settings, and setup the image dimention size for the Product Image, this is our recommence setting - https://tppr.me/IbRvL
Go to Tools/Regenerate Thumbnails and click the blue button Regenerate Thumbnails For All xx Attachements and wait for the process completed
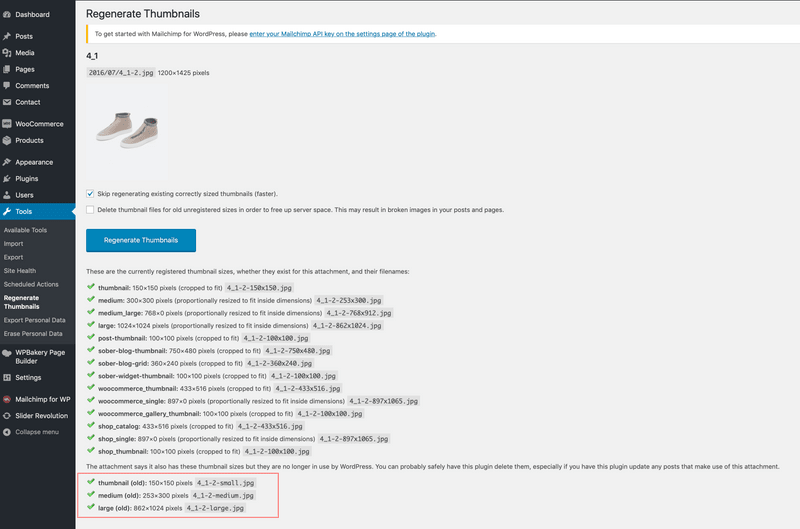
To check if the image is generated correctly, go to Media and click to view any image file, select Regenerate and you can check list or new images is generated with format xxx-smal or xxx-medium or xxx-large files
Permalink URL setting:
Go to Common Setting, change the URL to Post name, this is required for the setting otherwise some images could not loading.
Example: config for the mstore.io domain:
Membership registration:
Enable the option Anyone can register.
Enable Post a comment
Check the functions.php file which from the Wordpress theme folder of your backend side. Add the code below to the functions.php file (this could be added as the child function from your template):
function filter_rest_allow_anonymous_comments() {
    return true;
}
add_filter('rest_allow_anonymous_comments','filter_rest_allow_anonymous_comments');
Note: Remember, the WordPress permalink (Settings> Permalinks) must be the active option "Post name".
5. Setup FluxNews
After config your website with above plugins then it's time to connect it with the FluxNews app.
Open lib/env.dart and change the url from serverConfig section to your own website which has the API set: (For version 1.5.0 and earlier, open /lib/common/config.dart)
/// Server config
const serverConfig = {
  "url": "https://news.inspireui.com",
  "forgetPassword": "https://news.inspireui.com/wp-login.php?action=lostpassword"
};
Open lib/common/config_xx.json, with xx is language, e.g.: if you use English, open config_en.json. Under the HorizontalLayout is the setting to display the homepage layout, replace the category by your own category ID (this ID can get when edit from the category from admin site)
"HorizonLayout": [
    {
      {
      "layout": "logo",
      "showMenu": true
    },
    {
      "layout" : "header_text",
      "padding": 20.0,
      "fontSize": 30.0,
      "isSafeArea": false,
      "title" : "Explore daily recipe within a tap"

    },

    {
      "layout" : "largeCardHorizontalListItems",
      "imageBorder": 20.0,
      "category": 41
    },

    {
      "layout" : "sliderList",
      "type" :"",
      "name": {
        "en": "Recent Recipe",
        "ab": "Recent Recipe",
        "vi": "Recent Recipe"
      },
      "category": 36
    },
    ...
]
⚠️ Note:
- If you can not see the Post Image, please check the
Regenerate Imageguide above.- If you are setting the site as local, make sure it is the local IP address or the
virtual host, and it can be reached from the simulator.
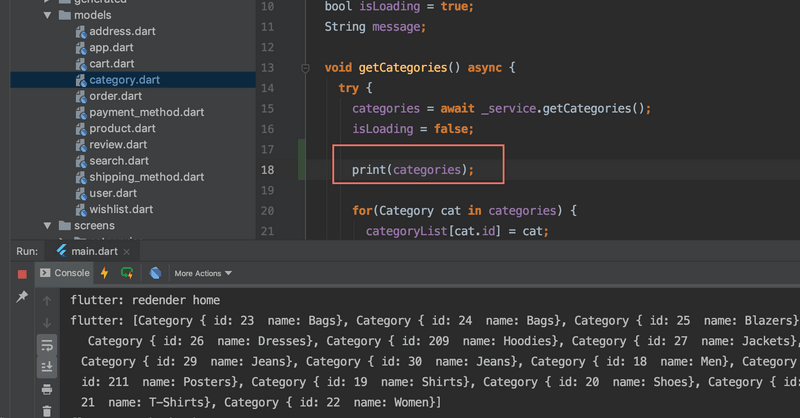
💡 Tip: to quickly show the category ID, go to lib/models/category.dart and print the return
categoriesobject from return JSON
6. Next step
Go to next Customization Guide to know more about how to customize the app branding, color theme and advance configs.
When installing, if you get issue, please share the screenshot of the issues and post to our https://support.inspireui.com. It would be great if you could also use some free video tool like https://www.loom.com to take the video and send us the URL.
